A while back I posted a link to a tutorial that showed us how to build a neat command prompt with help from ZSH and Oh-My-Zsh. After a few days I started working on my own theme that fits my uses, and today I wanted to share it with you. I will write this as a complete tutorial, so you don’t have to jump between a bunch of articles to understand what’s going on. Here’s what it looks like
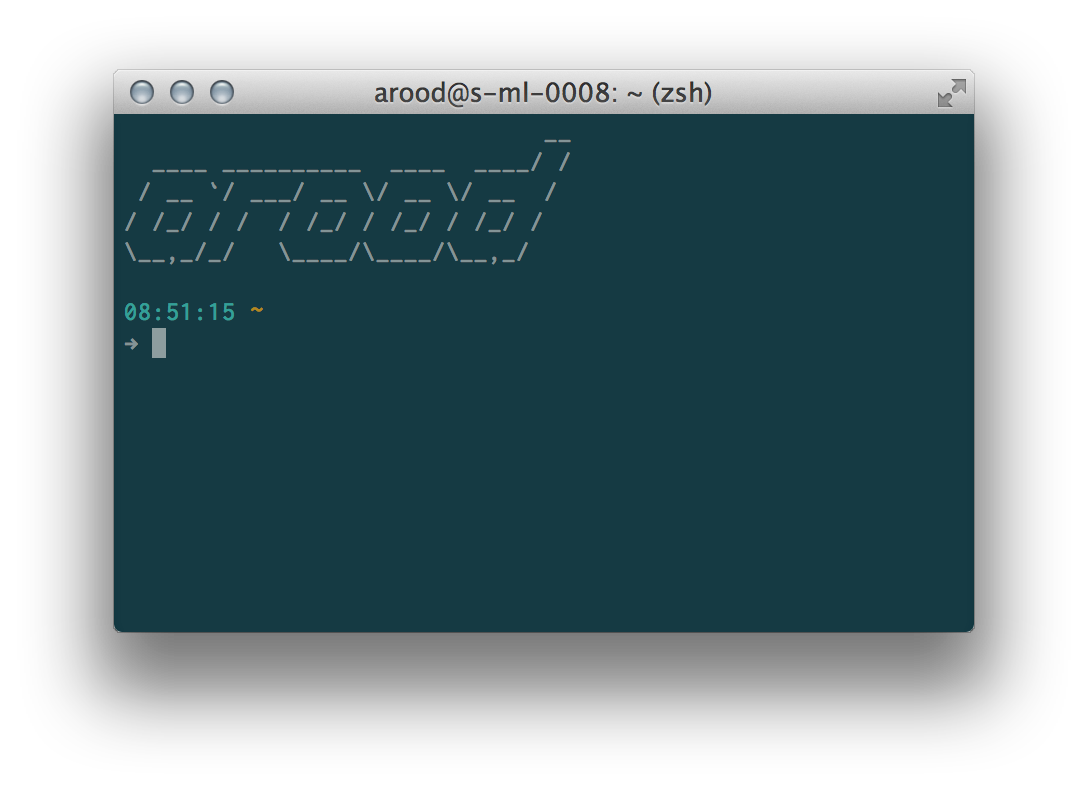
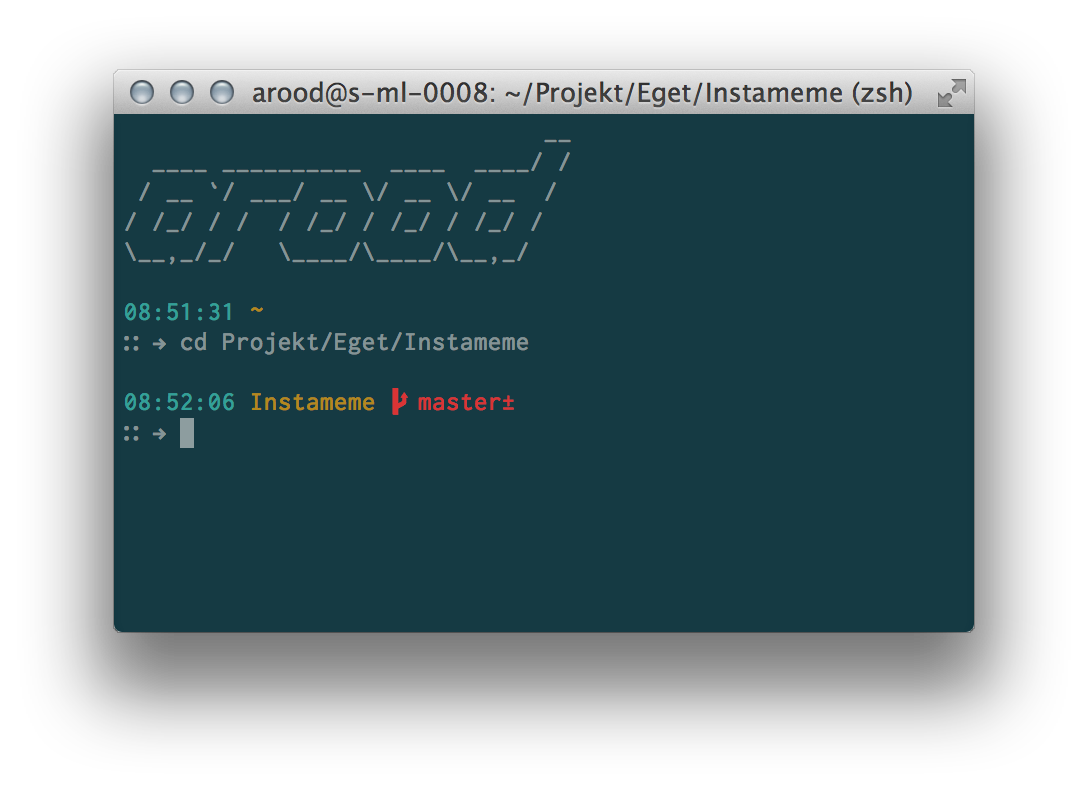
As you can see, it doesn’t show us very much information here. Most command prompts show things like the computer hostname or your username, but I already know this when I start my Terminal. But there are some more features hidden, that only shows up when I need them. The “arood” ascii is my MOTD, so it’s not a part of the theme! For example, if you’re hacking with a notebook in your bed or at a café, you’ll see a tiny battery indicator to the left, showing one dot for every 25% battery you have left. If the battery is charging, you’ll see a high voltage sign instead. And of course, a fully charged battery with a power source shows nothing. Also, if you’re working in a directory with a git repository, it will show you the current branch. If there are any changes that isn’t committed yet, you’ll see this as well.
Prerequisites
If you’re still reading, I assume you’re interested in trying this out. Here’s a short list of components you might need to install first.
Color scheme
I’m currently using the popular Solarized-theme by Ethan Schoonover. If you’re using Terminal.app on Mountain Lion you simply download the theme and double-click the theme you like in the osx-terminal.app-colors-solarized folder.
Font
The font I’m using is called Inconsolata, at 11 pt, it’s a free monospace font that looks great both on a regular screen and on retina screens, at least in my opinion. In Terminal.app you change the font where you change the color scheme.
ZSH and Oh-My-ZSH
You will also need to change shell in terminal to ZSH. It’s compatible with bash, but with a little help from Oh-My-ZSH you will get a much better prompt experience. If you’re using Terminal.app, you can do this by opening Preferences and changing “Shells open with” to “command”, and change the value to /bin/zsh. Oh-My-ZSH can be installed with a single command. Or if you’re a bit skeptical against running shell-scripts downloaded straight from the Internet (which you should, because that’s scary!) there are manual install instructions on the Github-page. But if you’re lazy like me, here’s the command:
curl -L https://github.com/robbyrussell/oh-my-zsh/raw/master/tools/install.sh | sh
Settings are stored in ~/.zshrc, so open this file in your favorite editor because you’ll be editing this a lot today.
Battery
If you’re not interested in showing the battery indicator, you can skip this part. If you read the Nettuts tutorial I posted earlier, you’re probably aware of the Python-script originally written by Steve Losh. I’m also using this, but I’ve made some modifications:
- It doesn’t show anything when the battery is fully charged and connected to a power source.
- I’m using unicode characters instead of multiple characters for the indicator.
- I removed the green color.
I made a file called
~/.terminalstuff/batcharge.py, and below is the complete file with my changes. Note: Some users have reported problems with pasting this script. So far it seems like editors like Sublime Text saves it propertly.
#!/usr/bin/env python
# coding=UTF-8

import sys
import math, subprocess

p = subprocess.Popen(["ioreg", "-rc", "AppleSmartBattery"], stdout=subprocess.PIPE)
output = p.communicate()[0]

o_max = [l for l in output.splitlines() if 'MaxCapacity' in l][0]
o_cur = [l for l in output.splitlines() if 'CurrentCapacity' in l][0]
is_charging = [l for l in output.splitlines() if 'IsCharging' in l][0]
charger_connected = [l for l in output.splitlines() if 'ExternalConnected' in l][0]

color_green = '%{[32m%}'
color_yellow = '%{[1;33m%}'
color_red = '%{[31m%}'
color_reset = '%{[00m%}'

if "Yes" in charger_connected:
    if "Yes" in is_charging:
        sys.stdout.write(color_yellow + (u"⚡ ".encode('utf-8'))+ color_reset )
else:
    b_max = float(o_max.rpartition('=')[-1].strip())
    b_cur = float(o_cur.rpartition('=')[-1].strip())

    charge = b_cur / b_max
    charge_threshold = float(10 * charge)

    # Output

    total_slots, slots = 10, []
    filled = float(math.ceil(charge_threshold * (total_slots / 10.0)))

    if filled >= 7.5:
        out = u'∷'
    elif filled >= 5:
        out = u'∴'
    elif filled >= 2.5:
        out = u'∶'
    else:
        out = u'⤬'

    color_out = (
        color_reset if filled >= 5
        else color_yellow if filled >= 2.5
        else color_red
    )

    out = color_out + out.encode('utf-8') + ' ' + color_reset
    sys.stdout.write(out)
The theme itself
Now it’s finally time to create the zsh theme itself. I won’t go into detail about how everything works, check out the Nettuts tutorial if something doesn’t make sense (or leave a comment). First thing we gotta do is browse to the theme folder: ~/.oh-my-zsh/themes. In here we’ll create a new file for our theme, I called mine arood.zsh-theme. Inside this file we’ll paste this:
prompt_git() {
  local ref dirty
  if $(git rev-parse --is-inside-work-tree >/dev/null 2>&1); then
    ZSH_THEME_GIT_PROMPT_DIRTY='±'
    dirty=$(parse_git_dirty)
    ref=$(git symbolic-ref HEAD 2> /dev/null) || ref="➦ $(git show-ref --head -s --abbrev |head -n1 2> /dev/null)"
    local output="${ref/refs\/heads\//⭠ }$dirty"
    if [[ -n $dirty ]]; then
      echo -n "$fg[red]$output"
    else
      echo -n "$fg[green]$output"
    fi
  fi
}

function battery_charge() {
  if [ -e ~/.terminalstuff/batcharge.py ]
  then
    echo `python ~/.terminalstuff/batcharge.py`
  else
    echo ''
  fi
}

function precmd() {
  print -rP '
$fg[cyan]%D{%H:%M:%S} $fg[yellow]%c $(prompt_git)'
}

PROMPT='%{$reset_color%}$(battery_charge)%{$reset_color%}→ '
RPROMPT=''
If you don’t want to show the battery indicator, just remove the $(battery_charge) part from PROMPT. Now, simply open your .zshrc-file, set the ZSH_THEME property to “arood”, and restart your terminal. You should now see your new and fresh terminal.